Here’s my scheme for taking five pictures of one item to post on Etsy.

1. An eye-catching picture. It’s likely a closeup showing the most gorgeous detail of something.
2. A second eye-catcher that shows more of the item.
3. A demonstration of how the item looks when worn. I don’t want to wear things that I’m going to sell, so I’ll have a bundle of fabric ‘wearing’ a necklace, or a pair of earrings hanging from a horizontal ribbon or twig.
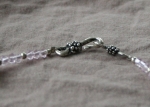
4. Something technical. If it’s earrings I’ll show the wires or hooks in detail; if it’s a necklace or bracelet I’ll show the clasp.
5. Size scale. I usually take a picture of my hand holding the item. Nobody’s hands are exactly the same size but it gives a better estimate of scale than, say, a coin, and it’s prettier than using a ruler. (Anyone who wants exact dimensions can look in the description.)

I am not an expert at this, but that’s my script. What’s yours?

Read back for a refresher in all the GIMP features we’ve used before, because we’re going to be using them all in this project.

Again, we’re making a banner from your own photography. Cartoons and cute graphics are okay if people already know what you sell, but remember that on Etsy people might just click your username in the forums without any other knowledge of your shop. The banner should encourage them to scroll down, just as your avatar should encourage them to click in the first place. (more…)

Flowers growing out of brass ruins.

Okay, I wasn’t planning on writing anything about photography itself, but I keep getting asked. Here are the tips that made my photography improve so dramatically that an Etsy admin told me she was in tears and put one of my items in a gift guide.

I’m not getting into the minutiae of tweaking your camera’s settings, since every camera is different. Everything I list here is something you can probably do with any modern digital camera, even the cheap point-and-shoot ones. Look up the various modes and features in your camera’s manual (and remember that if you don’t have the manual, the camera manufacturer may have it online).

1) Use a tripod. Holding onto the camera makes it shake, and that shake can be picked up as blurriness in the finished picture. Even cheap cameras have a threaded hole on the bottom for a tripod, and tripods themselves are cheap — if you don’t want to go all-out on an expensive Manfrotto or something, go to a big-box electronics store and buy a little tabletop tripod for under $20.

2) Use the timer setting. Again, even cheap point-and-shoot cameras often have a timer, since a lot of people like to set up a picture and then run to be in it. In the case of product photography, this is one more thing that will let you take a picture without touching the camera and introducing shake. The timer setting is usually indicated by a little clock icon.

3) Use natural lighting. Lightboxes are neat, but they really just try to emulate the indirectness and colourlessness of natural light. If you have a room with windows, open all the curtains wide and set up your item to be photographed so that no sunbeam is falling directly on it. If you think it’s too cloudy or too dark out to take pictures, try it anyways and see what you get. If you find that your ideal lighting doesn’t naturally happen often enough, then build yourself a lightbox. A lightbox or proper natural lighting will let you take pictures without flash, which is a good thing, because flash introduces glare and funny colours.

4) Use the macro setting. Many cameras have preset modes for different kinds of pictures. Macrophotography means closeup shots (think about taking pictures of flowers or bugs), and that’s what you’re probably doing if you’re photographing something like jewelry or toys. Your camera’s preset macro mode is probably indicated by a little icon that looks like a tulip.

5) Choose your background wisely. Avoid complex patterns, because your item will get lost in them. Use solid colours that contrast with the colours of your item, and try to get textures that don’t glare too much (no glossy paper) or that show up imperfections (no fuzzy fabrics with cat hair clinging to them). To get a variety of colours cheap, go to an art store and get a selection of cardstock or fancy paper, or go to a fabric store and buy a yard each of different colours of cheap cotton broadcloth.

I know the berries are pretty, but don’t eat them. Look what happened to the last poor fool who tried.

Okay, now that you know how to resize and crop your images, we’re going to do a little thing involving both of those: make an avatar for your shop! (more…)

I love the look of ancient Egyptian jewelry — their taste in glass beads was very classy. This set is inspired by all those ancient makers whose stuff is all stuck in museums now, never to be worn again.

It’s commonly known that dragons like shiny things as much as ravens do. Treasure hunters are often surprised, however, by the aesthetic sense of dragons — for example, in this case the dragon preferentially hoarded things that matched her scales.

(Support ethical treasure hunting — only buy from certified naturally-abandoned hoards!)

Item #1 — Thanks to everyone who entered the giveaway! The winner is Kat from KatScratch Bead Works — check out her shop, she has some gorgeous and unique handmade beads!

Item #2 — My Darling Buds earrings have been selected for a flower-themed vote in the Storque!

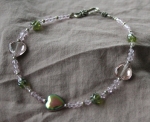
Leave a comment here for your chance to win this sweet springtime-hued bracelet! I’ll make a random draw from all comments on Saturday, 16 May, at 9 am Eastern time, and contact the winner for a shipping address.

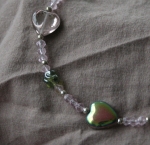
Irregular pink glass crystals and silver-toned seed beads compliment strangely organic green shapes and pink hearts with green-and-pink iridescent finish on one side.

At 23.5 cm (9 1/4″), this is suitable for a larger wrist and hand.